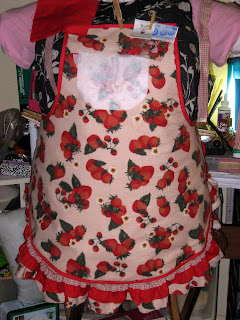
My grandmother has a love for strawberries. Her kitchen theme is strawberries. I was asked a few years ago to make a strawberry apron with a protective layer to keep water from soaking through and getting on your clothes. Okay, no problem, atleast that is what I thought. It is not easy finding strawberry fabric. I finally found some in a flannel. I have all my materials handy and even purchase some strawberry buttons from Etsy and Hobby Lobby to decorate with on the pockets and straps or whereever.
I go through my stash of fabrics and find a nice mauve gingham to use as a backing and I even had a bit of red cotton fabric. I use the red to accent the strawberry flannel fabric in the ruffle and decide the gingham would look good too. I'm almost done. Here are some pictures. The only thing left to do is, sew on the ruffle and the straps, make the pocket and sew it on, add buttons and give it a wash and done.
see the pocket pattern
ruffle:
buttons:
I'm pretty close to finishing this. It shouldn't have taken me almost 2yrs to do this but depression has been a horrible roommate. While working on this, despite the flaws I know it has, I like it and I think I just might make me something like it for my own kitchen.
Here are a few more pics showing my furry helper while I was pinning the ruffle on. My furry helper is our rescue kitty Gwen. She's such a sweetie and always looks like she's smiling.
Thursday, July 21, 2011
Strawberries
Labels:
apron,
button,
buttons,
fabric,
gingham,
kitteh,
kitty,
red,
ruffle,
sew,
sewing,
sewing helper,
strawberries,
strawberry
Not a lot Lately
I thought I was getting back into creating but the last few weeks have been very iffy even after I cleaned up my space and made a little bit more room. I really don't have that much space to work with or quiet either whenever the hubs is at home. I try very hard to make what I have work, yet I still find myself wishing for that extra room that I can call my own, ALLLLLLL MINE!
In order to cut out fabric and have a symblance of a table this is what I have to do. Take 6 TV tray tables of all the same height, if they aren't find books or so forth to make the smaller tables as tall as the others. In the pics I only have 5 cause the 6th one had stuff all over it and I didn't feel like moving the stuff. I use masking tape to tape down the corners of the cutting cardboard mat to the tv tables to keep it steady and not moving as I work. Also liberally dot area with curious kitties. The last thing is a must, kitties.
I also finally got around to make a duct tape dummy, FINALLY, I hate it. I'm gonna save up my money and get me a dress form but so far, can't seem to find any that size up to my measurements. What a horrible wake up call. :(
Here is a top I made that didn't come out right because I didn't double check the knit fabric before cutting. The stretch is going up and down instead of side to side. It works as a sleep shirt and a bathingsuit cover up. So I guess it wasn't a total loss. I guess next time i'll follow the directions better too. I found the instructions on Burda Style in the free patterns section. I was also trying to use fabric I had on hand.
Labels:
crafting,
crafts,
creative,
creativity,
DIY,
dress dummy,
dress form,
duct tape double,
making do,
sew,
sewing,
sewing table
Subscribe to:
Posts (Atom)